
A Detailed Guide to Building a Percussion Repair Schedule & Budget
One thing we can all agree on is that percussion instruments add unique characteristics to any ensemble both audibly and visually. The percussion section has just as many different types of instruments as a concert or marching band and although many programs get their wind and brass instruments serviced every summer and throughout the year, the percussion section is often left alone until something breaks. In some instances, new percussion instruments are purchased when an older one breaks when it could have been fixed for a fraction of the cost or even prevented with regular maintenance. With a little planning, you can keep up with your percussion equipment and have a good idea of how much money you should budget to handle your repair needs.

Building A Repair Schedule
Why a Rotating Percussion Repair Schedule Matters
Just like other types of musical instruments, percussion equipment requires regular care and maintenance to function properly. Given the wide variety of percussion instruments—from drums and cymbals to mallets and timpani—creating a rotating repair schedule is a proactive approach to reduce downtime during rehearsals or performances and helps avoid major, costly repairs. It also spreads the workload over time and cuts down on emergency repairs. Think about it like your vehicle, scheduling routine maintenance helps the vehicle run as intended and also prevents emergency repairs.

Before you begin to make a personalized maintenance schedule, you first need to understand your current equipment inventory.
Creating Your Percussion Inventory
1. Create a spreadsheet and list all of your percussion equipment
List all of your percussion equipment in the first column of your spreadsheet. We recommend grouping them by category so you can find them quickly.
Your main categories should be broken into concert, marching, and drum set.
Concert: Timpani, Snare Drums, Toms, Bass Drums, Keyboards, Cymbals, Auxiliary Instruments, Hand Drums, Sticks / Mallets / Beaters, and Stands
Marching equipment: Snares, Tenors, Basses, Cymbals, and Stands as well as any Sticks / Mallets / Beaters that the school owns
Drum Set: Snares, Toms, Bass Drums, Hardware, & Cymbals for each drum set the school owns
In your columns 2 - 5 list the manufacturer, the model number of the equipment, the size of the drum / range of the keyboard, and the serial number.
We’re not going to lie, this takes quite a bit of time and we recommend including your students in this entire process as it will help them buy into the idea of taking care of the equipment. If you already have an inventory list compiled, use that list to get you started.
2. Assess the condition of each item
Column 6 should be dedicated to the condition of each item. Use ratings such as great, good, fair, poor, and broken to describe the condition of the equipment. We also recommend using either different text colors or background colors for each rating to make it easy to identify the rating. You can do this by setting rules in the data validation menu on most spreadsheets.
Although this post is about building a regular maintenance schedule, you can use this data to help you decide what equipment needs immediate attention to get it operational and after it is repaired, you can include it into your regular maintenance routine.
Column 7 should list how often the equipment gets used. Use categories such as daily, weekly, monthly, and marching or concert season to help you plan out when you’ll want to service the equipment. Remember that your daily instruments should be serviced regularly.
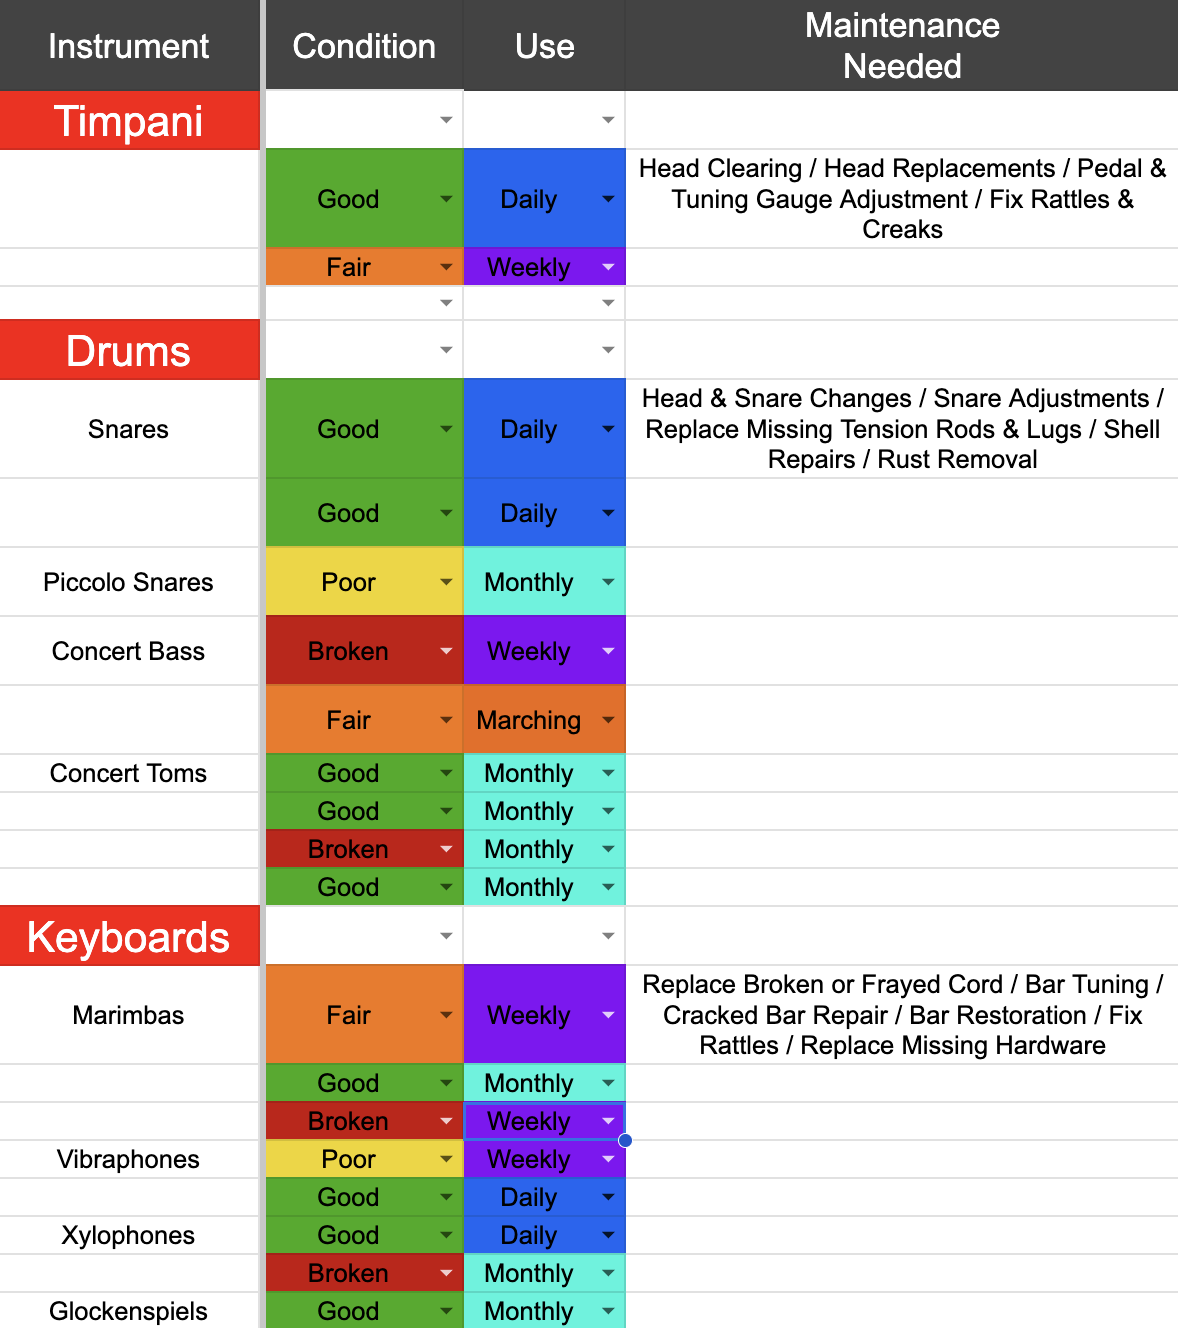
3. Determine the type of maintenance needed
Column 8 labels what type of regular maintenance is needed on the instrument. Here are some ideas for what each type of instrument requires:
Drums - head and snare changes, snare adjustments, replace missing tension rods or lugs, shell repairs, and rust removal
Keyboards - replace broken or frayed cord, bar tuning, cracked bar repair, bar restoration, fix rattles
Timpani - head replacements, head tuning, pedal & tuning gauge adjustments, fixing rattles or squeaks
Cymbals - cutting out cracks, reshaping, or re-lathing
Auxiliary - new tambourine heads, restring castanets, restring triangle clips
In Column 9, create categories for maintenance: light (e.g., cleaning), moderate (e.g., replacing worn drum heads), and heavy (e.g., reheading drums or refurbishing a snare).
4. Set Time Intervals for Each Category
Once you understand what needs maintenance, establish a timeline for each type of repair. For example:
Light maintenance (e.g., cleaning cymbals, checking drum heads) could be done monthly.
Moderate maintenance (e.g., replacing worn-out heads or adjusting pedals) could happen every 3-6 months.
Heavy maintenance (e.g., professional repairs on cracked shells or re-lathing cymbals) could be done once a year or as needed.
A simple way to keep track is by rotating the equipment based on your musical ensemble. Try building your rotation based on the performance schedule of your musical ensemble. For example:
January: Accessories & Cymbals
April: Bass Drums & Stands
July: Keyboards & Marching Percussion Equipment
October: Timpani & Snare Drums
5. Track Everything
Use a maintenance log or digital tool to track when each piece of equipment was last serviced, what work was done, and when it should be checked again. This can be an Excel spreadsheet, a Google Calendar with recurring reminders, or even a simple poster in the percussion section. Bonus points if you can find a way to incorporate students into this process.
6. Add Buffer Time for Unexpected Issues
It’s wise to leave some flexibility in your schedule for unanticipated repairs. Accidents happen and sometimes equipment breaks down unexpectedly. Having a bit of cushion in your schedule means you won't be scrambling to fix everything at once.
7. Implement a weekly repair routine
Monday - Maintenance Monday (light fixes)
Wednesday - Wing Nut Wednesday (snug all wing nuts)
Friday - Fix It Friday (use this time for larger projects)

Developing a Percussion Repair Budget
A key component of maintaining percussion gear is budgeting for repairs. A well-developed budget allows you to plan ahead and allocate resources for equipment upkeep, making it less likely that you’ll be caught off-guard by major repair costs.
Here’s how to create an effective repair budget for your percussion instruments:
1. Assess Repair Costs
Start by determining the costs of typical repairs or maintenance items for each piece of equipment. Drum heads might cost in the range of $30-$150, while a bar repair could cost between $50-$120. Professional repairs on timpani, bass drum or chimes can be much higher. Research prices for common services and parts to estimate annual repair needs.
2. Estimate Frequency of Repairs
Based on how frequently your percussion instruments are used, estimate how often you’ll need to perform maintenance. For example, if you have 10 snare drums, and you expect to replace heads every six months, that could be a significant cost to plan for. Consider the lifespan of items like mallets and heads and the wear they accumulate based on use.
3. Include Emergency Fund
Equipment failure isn’t always predictable. It’s a good idea to allocate about 10-20% of your total repair budget to an emergency fund for unexpected repairs. This will give you flexibility if something breaks suddenly, such as a cracked drum shell or a malfunctioning pedal.
4. Prioritize Repairs Based on Need
Not all repairs are created equal. Some repairs (like a broken snare wire) may be urgent, while others (like refurbishing a less frequently used instrument) can be put off for a while. Prioritize essential repairs and maintenance first and give yourself room for optional upgrades or repairs in the future.
5. Track and Review
Just like your repair schedule, your budget should be tracked regularly. Keep a record of expenses throughout the year, and put reminders in your calendar to review the budget quarterly to make sure you're staying on track. You may find that certain items need more frequent maintenance or repairs than you anticipated.

6. Incorporate Cost-Saving Measures
Try buying parts in bulk, such as drum heads or sticks, to take advantage of discounts or to lower shipping costs by shipping everything in one order. Get yearly maintenance done on your equipment to prevent emergency costs. Use high-quality accessories (like mallets or drum heads) that last longer, saving you money on frequent replacements.
7. Communicating your repair needs with administration, finance department, staff, or booster organization etc.
If you’ve done a great job with your record keeping, you now have invaluable data to back up your budget needs.
Conclusion
Does this sound like a ton of work? Well, it is but once you’ve made it through these steps, you can set your regular maintenance schedule on auto-pilot and make small adjustments to your budget at the end of each semester. We challenge you to make a commitment to documenting everything for one entire school year so the following years can run on schedule with minimal effort.
Maintaining a rotating percussion repair schedule and a well-organized repair budget is vital for keeping your equipment in optimal working condition. By proactively planning maintenance, assessing repair needs, and setting aside funds for repairs, you ensure that your percussion instruments function correctly and will always be ready to deliver the best sound possible for your students.
Whether you're managing a group of percussionists or just taking care of your personal collection, these strategies help spread out repair costs and ensure your equipment continues to thrive.
Happy Drumming!!